
I wanted to start a new series of designs that will focus on gorgeous, creative ways to frame photographs within your paperweights.
The first paperweight in this series requires just a few supplies and tools to create a vintage-inspired design that will beautifully frame a modern or period photograph. Although I used pearls for this paperweight, you can use other bead and background colors to create a completely different look.
To re-create this paperweight, you'll need the following iems: Heirloom Dome Paperweight Kit (PhotoWeights: Heirloom Dome), two sizes of pearl beads (4mm and 8mm), swatch of paper in a color of your choice, clear glitter, white glue, Aleene's Tacky Glue, and a 1" circle hole punch.

The first step to creating this paperweight design is to trace the area from your circle hole punch onto the background paper you're using. I did this by punching a hole in a business card and tracing within the opening.

The 1" circle was traced onto the paper first so I could use this as a center reference when I traced a larger circle that's the size of the Heirloom Dome's display area (PhotoWeights: Display Area Template).

Using a pair of sharp scissors, I cut along the outside line.

Many hand-held hole punches available in craft stores limit the distance you can punch from the edge of the paper. To compensate for this, I cut a straight line to remove enough paper to allow me to punch out the circle I traced earlier.
Because the paper will be covered in the final design, the seam that will be left won't be visible.

Center the traced circle into the viewing window of the hole punch, usually found on the bottom. Once centered, punch out the desired area.
The hole punched into the background paper will frame your photograph.

After you've cut your photograph to fit within the 1" circle, apply white glue (Elmer's is just fine) around the opening. Be sure to spread the glue evenly to prevent it from seeping out from underneath.

After the glue used in the previous step has set for a few minutes, you can apply the piece to the adhesive side of the mounting board (included with each PhotoWeights paperweight kit). Also affix the small portion of paper that was cut earlier.

Now that the photo and background paper are attached to the mounting board, it's time to get to work!
I applied Aleene's Tacky Glue around the photograph. (I prefer to use tacky glue for this type of application because it's thick and stays in place. It also remains flexible while it's drying, making adjustments easy.) If you don't apply enough glue to fit two rows of beads, you can always add more glue later.

I used two sizes of beads in this paperweight, 4mm and 8mm. The 4mm beads were applied first, circling the photo. The 8mm beads followed. Be sure none of the holes in the beads face upward.

After all the pearls are in place, you can make any necessary adjustments to even out the spacing and make sure the holes aren't visible from above.

I didn't want to leave the paper around the pearls untouched, so I decided to cover this area with clear glitter. To do this, I started by brushing a layer of white glue outside the larger row of beads.

With the piece over a small bowl, I sprinkled the clear glitter onto the white glue. Tap the edge of the card onto your work surface to remove excess glitter.

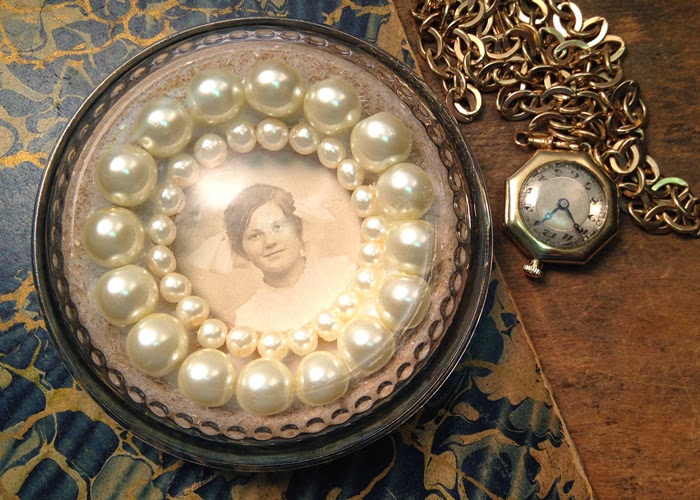
Here is a photo of the finished work, ready to display in the paperweight.
VERY IMPORTANT
One thing that's difficult to capture in photos is the amount of drying time that is required before you can place your finished artwork in the paperweight.
If you seal up your paperweight while the glue is wet, evaporation from the glue will cause the inside of your paperweight to become cloudy and humid.
I recommend allowing your artwork to dry for at least 24-hours. When the glue is completely dry, check to make sure all the beads are securely in place. You should also remove any stray particles of glitter with a small, dry paint brush and/or gentle puffs from a can of compressed air.

To finish your paperweight, center your artwork onto the adhesive side of the bottom pad and press it in place to secure.

After you've cleaned your paperweight with streak-free glass cleaner, apply the bottom pad face-down onto the base of the paperweight.


0 comments:
Post a Comment
Please join in the conversation! We'd love to hear from you!