3/27/2015

Antique, French Playing Cards Showcased in a Glass Paperweight


I haven't worked with our Large Round Paperweight Kit for a while, so I thought I'd design a project especially for this style.

The Large Round has just a light recess on the bottom, so you're limited to displaying very thin objects such as photographs and artwork printed on paper.  Because I'm adding some antique, French playing cards, I'll be excluding the mounting board to conserve some much needed space.


The playing cards I'm using are smaller than the cards we're accustomed to in the United States.  They measure 2 1/2" x 1 13/16" which makes them perfect for paperweight designs.  (I'll provide more information about these cards later in this post.)  I also used a sheet of striped scrapbooking paper from a paper stack pad. 

The paperweight kit (PhotoWeights: Large Round) is available on our website at PhotoWeights.com.


In order to conserve some space (thickness), I won't be using a mounting board for this project.  Instead, I'm using a template (PhotoWeights: Display Area Template) to trace an outline in pencil that's the exact size of the mounting board.


After I cut along the pencil line I traced , the scrapbook paper is the perfect size.  If any traces of pencil remain along the edge, use an eraser to gently remove them.


The antique cards I'm using were made by B.P. Grimaud in Paris.  Some of Grimaud's cards are more plain than these.  Others come in themed editions that are much more beautifully illustrated.  I paid about $10.00 for two of these decks at a flea market.  You can also find full and partial decks on Ebay and Etsy from time-to-time.

If you have some antique or collectible cards of your own, I would recommend researching them on Google, Worthpoint, or Ebay before you begin to cut and glue them.  They may be much more valuable than you think.


I placed the cards on the background paper using double-sided tape.  You can also use a liquid glue.  Adhesives such as foam mounting tape, rubber cement, and hot melt glue would add too much thickness to the design.

The King card was cut along the bottom-left corner to follow the curve of the paper.


Once the cards were in place, the background paper was placed face-down onto the bottom of the paperweight.  Because of the way the paperweight is designed, you won't be able to notice if your cut line along the edge of the paper is not perfectly even.


The final step is placing the adhesive pad (included with each PhotoWeights paperweight kit) over the bottom surface.


I hope you liked seeing how this paperweight design was made.  If there's a particular type of item or craft you would like me to feature on our design blog, please let me know.


3/24/2015

Make a Scrapbook Embellishment Sing with a Touch of Crystal Glitter


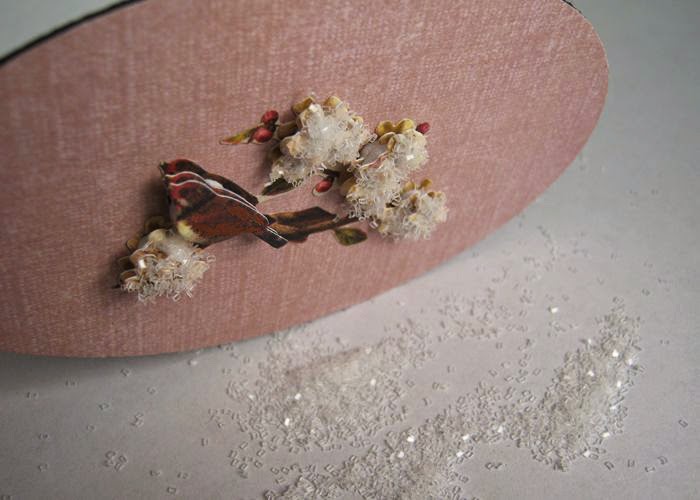
Some scrapbook embellishments can use a little extra something to make them truly special; maybe a few rhinestones or some metallic paint.  In this example, I added crystal glitter to the flowers of a dimensional sticker to give it more beauty and sparkle.


The sticker I used came from a collection of Grand Adhesions Dimensional Stickers (BW Flora & Fauna, Birds and Leaves) designed by Brenda Walton for K&Company.  I also used a sheet of pink paper from K&Company's Julianne Solid Mat Pad.

I chose the Elegant Oval Paperweight Kit for this project because I thought it would frame everything beautifully.  (PhotoWeights: Elegant Oval)


The first step in creating a paperweight that features an embellishment, memento, or other curiosity is to construct a background on which to place it.  This is done by covering the self-adhesive mounting board (included with each PhotoWeights paperweight kit) with a piece of decorative paper.  You can use a variety of other materials, too.  Just be sure the item you're displaying can be adhered to it properly.


Using a pair of scissors, I cut the paper that extended beyond the edge of the board.  The edge of the board will act as an excellent cutting guide.


After the sticker was applied to the center of the mounting board, I went over it with an embossing tool and gently pressed down to make sure the adhesive came into contact with the background paper.  It's especially important to press down the edges and any small parts of the sticker such as the delicate leaves shown above.  If you don't have an embossing tool, something similar with a smooth point will also work.


After the sticker was securely in place, I applied white glue to the flowers and used my embossing tool to spread the glue evenly.


A generous amount of crystal glitter was sprinkled onto the glue.  (I placed a sheet of paper underneath the mounting board to catch the loose particles.)


I gently knocked the edge of the mounting board onto my work surface to free any loose particles.


After the glue was completely dry, I used a soft paint brush to remove any remaining pieces of loose glitter.  I was left with the finished design pictured above.

When you're working with glitter, it's important to remove any loose particles to prevent them from floating within the interior of your paperweight.


The mounting board was placed face-down into the recessed area on the bottom of the paperweight.


To finish, I applied the self-adhesive pad (included with each PhotoWeights paperweight kit) over the bottom surface of the paperweight.


You're left with a beautiful paperweight design that will last for years to come.


3/23/2015

Create a Bold, Statement Paperweight Using a Broken Pendant


Once in a while, something in my stash of craft supplies ends up being crushed or broken.  This was the case with this 'art-i-cake' crown and wings pendant.  The piece split in two which resulted in the loss of one of the rhinestones.

I didn't have the heart to throw the pendant away, so I decided to repurpose it as a piece of desktop bling.


This is one of those simple projects that only requires some background material (paper, fabric, etc.), as well as the dimensional item that will be the focal point of your design.

As is the case with all dimensional items, make sure it fits within the recessed area of your paperweight.  The recessed area is the ceiling height of the interior display space.

I used the Round Paperweight Kit (PhotoWeights: Round Paperweight Kit) which includes a self-adhesive mounting board and bottom pad, as shown above.


One of my favorite supplies to keep on hand are small books/stacks of cardstock scrapbooking paper.  These typically include a variety of colors and patterns, giving you a virtual library of backgrounds to choose from.


Place the adhesive side of your mounting board onto the reverse side of the paper (or other material) you'll be using as your background.


Using a pair of scissors, cut any material that extends beyond the edge of the mounting board.  The mounting board will act as an excellent cutting guide.


If you're working with a pendant that has a loop or a bail, remove it with a pair of jewelry nippers.  Use an emery board or fine sand paper to smooth the edges.


In the following steps I'll essentially reconstruct the broken pendant by gluing the pieces to the mounting board.


Lay the pieces of the pendant in the center of your mounting board and mark the edges of the pendant by placing removable tape on the board.  The tape will act as a guide when you're ready to glue the pieces into place.


I prefer to use hot melt glue for pendants that have impressed areas on the back surface.  Liquid glue will run, especially when it pools into impressions.  Hot melt glue will fill in gaps between the pendant and the mounting board.


After the pieces of the pendant were glued to the background, the rhinestone that had previously popped out was re-set with clear glue.


After the liquid glue holding he stone dried completely, the mounting board was placed face-down into the recessed area on the bottom of the paperweight.


To finish, I covered the bottom surface of the paperweight with the self-adhesive bottom pad.

3/11/2015

Using Embossed, Lettered Stickers to Create a Personalized Name Paperweight


I've collected several packages of lettered stickers over the years.  Most of the designs are a bit on the girlie side - colorful with glitter and sparkle.  I thought I'd switch gears a little and create a paperweight that's more masculine.

This project will cover the basic steps involved in creating a layout with lettered stickers; whether you're writing out a name, a monogram, or a short sentiment.


I'm using pieces from Tim Holtz's idea-ology collection for this paperweight.  This includes a piece of 8 x 8 collage paper from a paper stash book, as well as a set of Cirque stickers.

The paperweight style shown is the Heirloom Rectangle (PhotoWeights: Heirloom Rectangle).


The first thing you'll need to do is to create a guide line for the letters on the background paper you'll be using.   Because a pencil mark may leave some traces behind, even after you erase it, I prefer using tape that has a non-permanent adhesive that won't damage the paper.  You can also use Post-it notes (as shown above.)


The Cirque stickers (idea-ology #TH93082) have a slightly metallic, aged pewter finish with embossed detailing. Each letter measures roughly 1" high.


To center your text, adhere the stickers to your background paper beginning in the middle and working your way out.  Use the guide you created earlier to help ensure your letters are even.  To justify left or right, begin applying the letters from that side.

If you're not sure if the text will fit within the display area of your paperweight, check your layout periodically with a template or by placing the paperweight directly over your work.


 After the letters are in place, use a display area template (PhotoWeights: Display Area Templates) to trace around the area you would like to display in your paperweight.


Carefully cut the background paper along your trace line.


Place the background paper (with letters attached) to the adhesive side of the mounting board that's included with your PhotoWeights paperweight kit.


Once the background paper has been attached to the mounting board, it's ready to display in your paperweight.

To finish your paperweight, place the mounting board face-down into the recessed area on the bottom of the paperweight.  Lastly, cover the bottom of your paperweight with the finishing pad that's included with your paperweight kit.

You're finished!