10/06/2015

Dad's Tackle Box Paperweight - Vintage Fishing Lure and Line Sinker Tin Under a Glass Dome


I thought I'd work on a paperweight design for the guys today.  I'm not suggesting that fishing is strictly a guy thing.  I just wanted to do something a little less girlie that didn't involve bows and glitter.

If you're thinking about paperweight design ideas to create for holiday gifts, a collage similar to this can be created in a variety of themes.  You just need to keep the displayed items within the confines of the paperweight you're working with.


For this project I used the Heirloom Dome Paperweight Kit (PhotoWeights: Heirloom Dome).  My display items include a vintage postcard (for the background) and two finds from an old tackle box; a fishing lure and a tin that once held line sinkers.

Using a template (PhotoWeights: Display Area Template) I chose the area of the postcard I wanted to use as my background and traced a cut line along the opening.

I cut the circular area out of the postcard with a pair of scissors.

The postcard was affixed to the adhesive side of the mounting board.

I used liquid glue to attach both the tin and the fishing lure to the background (Aleene's Original Tacky Glue).  I chose a liquid glue because I wanted to be able to make some adjustments if I had to.  With hot melt glue, subtle shifts are impossible after a second or two.

Before I attached the fishing lure to the background, I secured the metal spinner to the yellow lure with hot melt glue so there would be no movement between the two pieces.  A line of tacky glue was applied along the bottom of the yellow part before it was set into place on the background.  I used a small dab of hot melt glue beneath the white material wrapped around the hook to secure the hook in place.

When you're including a fishing hook in your design, use one that does not include multiple hooks that may poke through the bottom of the paperweight.

IMPORTANT:  Before you move to the next steps, it's important to allow any liquid glue to dry completely.  If you place the artwork in your paperweight when the glue is still wet or even partially dry, condensation from the evaporation of the glue will form inside the paperweight.  This will result in a cloudy film.

After the liquid glue dried completely, the finished mounting board was centered and placed onto the adhesive side of the bottom pad.

After I cleaned the paperweight with glass cleaner and removed any dust, I centered the bottom pad over the base of the paperweight and lowered it into place.  To create a tight bond between the glass and the adhesive, I ran my thumb along the outside edge of the bottom pad.

A close up photo of the finished paperweight.

Finding the right items to use in a collage paperweight can be challenging.  There are size limitations because you're working with a limited area.  You also have to take weight into consideration.

When you're experimenting with layouts and designs, use your paperweight's mounting board to trace an outline on a plain piece of paper.  Use this as your temporary canvas by arranging items within the trace mark.  Place the glass paperweight over your layout to see how it looks.  Keep doing this until you're happy with the result.  (Remember to take a photograph for reference so you can easily recreate it.)

I'm always happy to help if you need help with your paperweight projects.  Don't hesitate to write me at susan@photoweights.com.


Posted on Tuesday, October 06, 2015 | Categories:

9/08/2015

Make a Felt Silhouette Paperweight of Your Favorite Dog (or Cat) Breed


Creating silhouettes can be challenging when you're cutting them out of fabric or felt.  This project offers a few tips that will hopefully make the process easier; whether the silhouette is of a son, daughter, or your favorite four-legged friend.


This design only required a few supplies.  Your list of supplies will change, depending on how you choose to embellish your silhouette.

My supplies included a sheet of green felt, background paper, a small piece of red ribbon, and some self-adhesive monogram letters.


The first step in creating your silhouette is to find the right artwork.  Many silhouettes are available online.  Just do a Google search for what you're looking for.  You can be generic (dog silhouette) or specific to a breed (scottie dog silhouette).  Be sure the artwork you choose is available for public use.

Before you print the artwork, you'll need to edit it in a word processing program or desktop publisher.  In addition to adjusting it to the right size, you'll need to flip the image horizontally so it faces the opposite direction of how you'd like it to appear.  (If you want the dog's tail to be to the right, print it so the tail is to the left (as shown above).

For better cutting results, print the image onto cardstock paper (about 110 lb).  I recommend printing three silhouettes with generous spacing between them.  If you make a cutting mistake, you'll have two extras on hand.


 Apply double-sided tape to the back of the silhouette you've printed.


After you've decided which side of the felt you would like the silhouette to be cut from, place the taped side of the printed silhouette to the opposite side.  If your artwork is printed on cardstock, it will add some stiffness to the felt which will make it much easier to achieve a more precise cut.

The felt I used is from a 9" x 12" sheet sold in Michaels stores under the brand Creatology.  The color is Olive.


Using a pair of good, sharp scissors, carefully cut your silhouette out with as much detail as you're able to achieve.  The paper on the back of the shape may not easily come off (depending on the strength of the tape's adhesive).  If this is the case, remove as much of the paper as you're able without altering the shape.


I cut a small piece of ribbon to act as the scotty's collar.  The ribbon was glued to the front of the felt and the ends were wrapped around to the back, glued, and secured with a piece of tape.


I used a scrap of decorative scrapbooking paper as the background.  Simply place the adhesive side of your mounting board (included with each PhotoWeights kit) and trim any paper that extends beyond the edge of the board.


The felt silhouette was attached to the background with white glue.  Use a cotton swab to spread the glue and remove any excess.  This will prevent any glue from seeping out from underneath.


Two monogram stickers were placed on the felt.  Although these are self-adhesive, I used a little white glue to make sure they stay put.  These sickers are from a collection by Momenta (ST-5263 Alpha Blk).  They have the look of miniature typewriter keys and measure 3/8" in diameter. 


Before I finished the paperweight, I wanted to add one last touch; a gold tag on the dog's collar.  I wasn't able to find anything in my craft drawers that would work, so I used the cap of mini craft brad.  After I removed the arms, I placed the cap on a piece of double-stick tape applied to the back of a business card.  The tape held it in place so I could easily touch it up with a gold paint pen.


The newly gilded, metal brad was the perfect finishing touch.  It was set on a generous dab of white glue.


FINISHING YOUR PAPERWEIGHT

After the glue had time to dry completely, the paperweight was finished by following the illustrated instructions included with our paperweight kits.


The mounting board (with finished artwork) was placed face-down into the recessed area on the bottom of the paperweight (above-left).  The adhesive bottom pad (also included with each PhotoWeights kit) was applied over the bottom of the paperweight (above-right).


I hope this project has inspired you to create a felt silhouette paperweight of your own.  If you'd like to view a tutorial about creating silhouettes from profile photographs, I recommend this 2010 blog post from Nelley Kelley Studio

Posted on Tuesday, September 08, 2015 | Categories:

6/15/2015

This Child's Antique Mirror Makes an Adorable Papeweight... Perfect for Quick Makeup Checks at Work


The centerpiece of this paperweight design is an antique hand mirror from a child's set.  It's made of nickel plated metal that I was able to brighten up with a little silver polish.

When the mirror is set it against a background of vintage-inspired paper, it's transformed into a special and unique piece.  It's also something you can keep within reach for those times you need to do a quick check of your hair or makeup at work.


I used the Large Rectangle Paperweight Kit (PhotoWeights: Large Rectangle) for this project.  The only other supplies I used included a scrap of decorative paper, the mirror, and some ribbon.  A hot glue gun was also used.


The first step to creating a paperweight that features a dimensional object is to create a background for the object to be adhered to.  This is done by applying paper, fabric, or other type of material to the self-adhesive mounting board that's included with each PhotoWeights paperweight kit.

In the image above, the adhesive side of the black mounting board was placed on the reverse side of a piece of decorative, floral paper.  (The floral paper had another design printed on the reverse side.)


After your background is attached to your mounting board, use a pair of sharp scissors to trim any material that extends beyond the edge of the board.  (The board acts as an excellent cutting guide.)


I tied a small bow around the handle of the mirror to dress it up a little.  The green bow coordinates with a color found on the floral paper I used.

Tip:  Double check to make certain your mirror and any embellishments you add will fit within the display area of your paperweight, especially the depth.


After I cleaned the mirror, I placed it on the mounting board and centered it.

Because I'll be using hot melt glue, there will be little opportunity to reposition the mirror once it's glued down.  I used removable tape (washi tape) as a guide to mark where the left and right of the mirror should be positioned.


The center of the back of the mirror is slightly raised, so I applied the hot glue around the center to avoid adding any additional thickness to the final design.  A dab of glue was also placed on the handle for added support.


After the mirror was secured in place, the guide tape was easily removed.


The mounting board (with mirror attached) was placed face-down into the recessed area on the bottom of the paperweight.


I finished the paperweight by applying the self-adhesive bottom pad, included with each PhotoWeights paperweight kit.


FINDING A MIRROR

Antique mirrors such as the one I used may be found on websites such as Etsy.com and Ebay.com. You need a smaller mirror which may be described as a toy mirror, doll mirror, or child's mirror.

Most craft stores sell small, thin, unframed mirrors that are perfect for creating mirrored paperweight designs.  You may also be able to use the mirror from an old compact.


5/15/2015

Framing a Photo in a Paperweight - Greeting Card Background with a Metal Frame Embellishment


This is the second paperweight design in my series on framing photographs.

If you're looking for easy ways to incorporate images into your designs, this step-by-step project can be modified to create a variety of different looks.


You'll need a few basic elements to replicate this layout.  I used the Oval Paperweight Kit (PhotoWeights: Oval), a greeting card, and a metal frame from a set of embellishments.  I'll point out some alternate materials as we go along.


I'm always using portions of greeting cards in my paperweight designs, especially greeting cards that are beautifully embossed with gold detailing.  In place of a greeting card you can use a scrap of decorative paper or fabric. Just be certain the material you use isn't too thick to fit within the paperweight you're using.

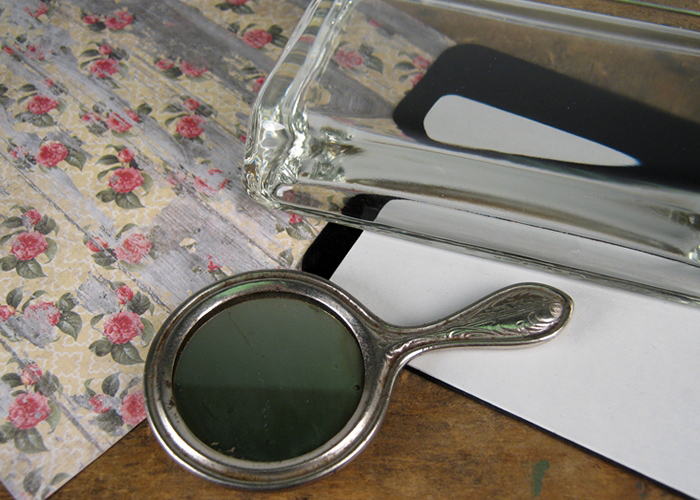
I used the display area template for the Oval paperweight (PhotoWeights: Display Area Template) to choose just the right area for my design before tracing a cut line.

TIP:  If you take one of our templates to the gift shop, you can see exactly how the design on a greeting card will fit within your paperweight.


Using a pair of sharp scissors, I cut along the traced line.


The cut-out from the card was affixed to the self-adhesive mounting board (included in each paperweight kit).


I created a reference mark in the center of the background, using a ruler as a guide.


The metal frame I used is the smallest of two included in a package.  These are made by Momenta.  Your local craft store should have a selection of embellishment frames to choose from in a variety sizes, shapes, colors, materials, and finishes.

If you'd like your frame to be a particular color, you can always paint it to match.

When you're working with the Oval Paperweight Kit, as well as other paperweight styles that limit the thickness of the items you can display, be sure to choose frames with a thin profile that will fit comfortably.


The 'x' I marked on the background helped me center the frame.  Once I checked the frame with a ruler to make sure there was an even amount of distance on all sides, I traced around the inside opening of the frame (in case the frame shifted).  I wrote down the distance between the edges of the frame to the end of the mounting board.


The frame I chose has a center opening that measures 1" square.  The photo was sized in a photo editing program to slightly more than 1".  When I cut the photo out, I left some additional material so there would be enough paper to glue to the frame.

Be sure to trim the photo if any edges are visible from underneath the outside edge of the frame.


The frame originally had two strips of self-adhesive foam tape on the back that I removed.

I applied glue around the opening for the photograph, making sure I used just enough to hold the photo in place.

When I'm working with metal, my favorite glue is Liquid Fusion from iLoveToCreate.  It's a clear urethane glue that's transparent and works well with both porous and smooth surfaces.


To prevent any glue from getting onto my work surface, I placed the photo on a scrap of cardboard and lowered the frame (with glue on the reverse side) onto it.

Let this set for about 5-10 minutes or until the photo is securely attached.


Now that the glue between the frame and the photo has set, you can apply adhesive to the back of the photograph.  Keep the adhesive from the edges so you can make adjustments without getting glue onto the background surrounding the frame.


Using your marks as a reference, place the frame in the center of your background.  Use the measurements you wrote down previously (the distance between the outside edges of the frame and the end of the mounting board) to make adjustments so it's perfectly centered.


Here's a close-up view showing the embossing and gold detailing of the greeting card artwork.

IMPORTANT

Before you seal your finished work in the paperweight, it's important to allow the adhesive to dry completely.  If you don't, evaporation from the glue may cause the inside of your paperweight to become cloudy.  I always recommend waiting 24-hours, depending on the type of adhesive and how thick it's applied.


Clean your paperweight with a streak-free glass cleaner to remove any dirt, dust, or finger prints.

After the glue in your artwork has had time to dry, place the mounting board face-down in to the recessed area on the bottom of the paperweight.


To finish, apply the self-adhesive bottom pad (included with each paperweight kit) across the bottom surface of the paperweight.

When you order a paperweight kit at PhotoWeights.com, you can select your bottom pad in your choice of three colors; black, burgundy, or green (shown above).  The only exceptions are the Dome, Heirloom Dome, and Deep Dome.  These styles are only available with black pads.