3/12/2013

Bronze Paisley Paperweight with Ribbon and Buckle


When I thought of doing a buckle paperweight, I purchased the supplies to take it in two very different directions.  There's the bronze paisley design that's shown, and one that will involve bright pink ribbon and a round, rhinestone buckle.  I'll save the glitzy one for next week.

This is an incredibly easy paperweight to create.  You'll need some decorative background paper, a slide buckle, and a short length of ribbon that fits the buckle's opening.  Our Heirloom Rectangle paperweight kit works very well for this project.


The photo above shows the finished design before it was displayed in the paperweight.  The adhesive side of the mounting board was covered with scrapbook paper (The Paper Company, Bronze Paisley on Ivory, P89103).  Before I adhered the buckle (La Mode Buttons Style 24763) to the background with fabric and paper glue, I slid the ribbon through the buckle, making sure there was an extra 2" on each end to tuck underneath the board. 

Once the glue on the buckle sets, secure the ends of the ribbon to the back of the board with a small amount of hot melt glue.  (I prefer hot melt glue for this step because it sets instantly and won't allow the ribbon to loosen.)

When the artwork is complete, place the mounting board (decorated side down) within the recessed area on the bottom of the paperweight.  Cover the base of the paperweight with the bottom pad that's included with each paperweight kit.

See our illustrated, step-by-step instructions at PhotoWeights.com.


3/07/2013

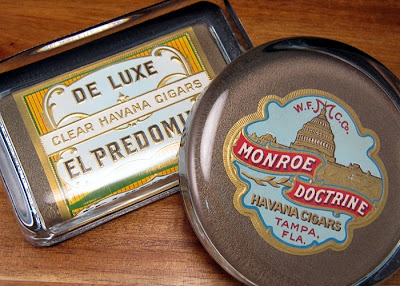
Paperweights Made With Vintage Cigar Labels


I love vintage cigar labels because they are true works of art that often feature beautiful fonts, flourishes, and gold embossing.  Because they can often be purchased for just a dollar or two each, they're also an affordable way to transform a "blank" paperweight into an attractive desk accessory any cigar aficionado can appreciate.

The labels I used are a recent find from an antique fair in Long Beach, CA.  When looking for labels for your own projects, here's a hint.  Bring one of our product brochures with you, along with a ruler, so you'll have the measurements for each paperweight style on hand.  This will allow you to check whether or not a label with fit into a paperweight's display area.  If you don't have one of our brochures, click here to request one.


The photo above shows the finished artwork ready to display in the paperweights.  The mounting board for each paperweight kit was covered with a clipping of scrapbook paper in shimmery bronze. The labels were attached to the bronze background paper with double-sided tape film.  I prefer using tape film because it very thin, allows the labels to lay flat, and doesn't require time to dry.

Once the artwork is complete, place the mounting board (image side down) within the recessed area on the bottom of the paperweight.  Cover the base of the paperweight with the bottom pad that's included with each paperweight kit.

See our illustrated, step-by-step instructions at PhotoWeights.com.