11/11/2011

Transform Last Year's Cards Into This Season's Holiday Cheer


Here's a little tip for those cards you've collected from years past.   Turn them into cute, whimsical paperweights to spread a little holiday cheer.  They make great gifts for friends and co-workers.

10/06/2011

Turn a Papyrus Halloween Card Into Three Adorable Paperweights


When I saw this Papyrus card in the store, I immediately pictured individual paperweights with a background for each character.  I love the results.  I hope you do, too.

The card (Papyrus - 
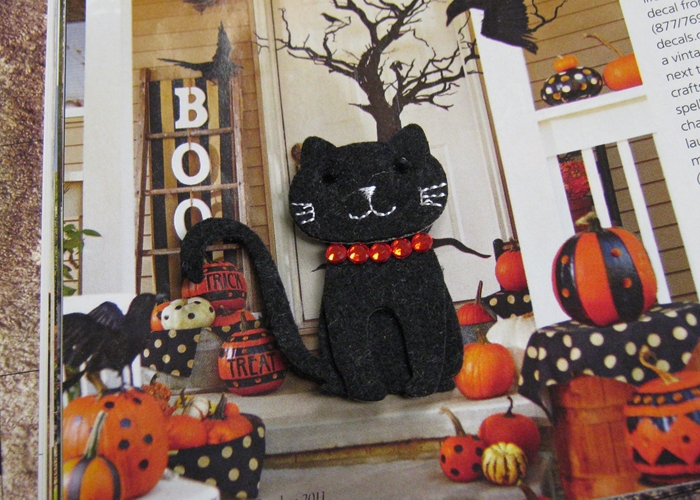
Halloween Icons, available at some Target stores) features a black cat, puppy, and an owl.  Each piece is made of felt with added embellishments - including a red, rhinestone collar for the cat.  At a cost of $6.95 for the card, you're paying a little more than $2.30 for each character which is truly a bargain.

Here's how I created these three paperweights:


The first step is to remove the felt characters from the card.  Do this as gently as possible to prevent them from being damaged.  Be especially careful with the owl's two delicate, die-cut feet.

Let's start with the black cat...


When I think of black cats at Halloween, I picture them sitting on a front porch surrounded by pumpkins and jack-o'-lanterns.  I thought this would be the perfect background.  Here's the easy peasy part.  I simply looked through a couple magazines and found the perfect photo.  Doesn't she look right at home?


I used the 
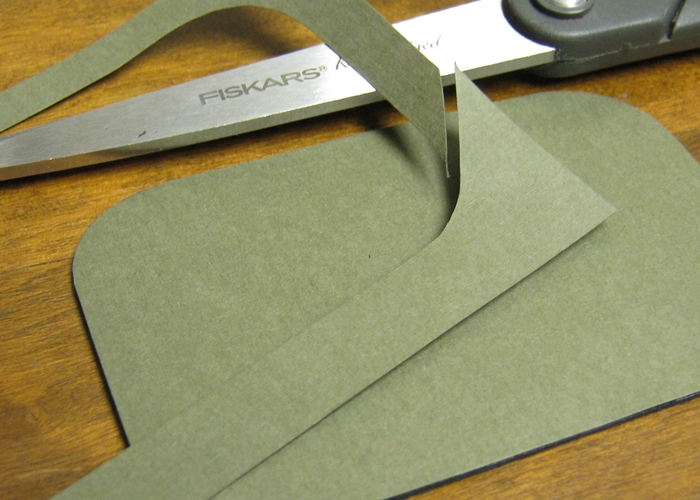
Heirloom Rectangle Paperweight Kit for this project.  The magazine photo was set on the adhesive side of the mounting board (shown above) and any paper that extended beyond the board was trimmed.  The cat was glued to the background with white glue.

Now for the owl...


For the fuzzy, little owl I used the greeting card's envelope to create an orange background.  Because I placed him in a dome paperweight (Dome Paperweight Kit - 1/2" Recess), I wanted to keep the background clean and simple.  Again, I used white glue to apply the owl to the background.

Last but not least, the puppy...


The background I used for the puppy is actually a Jimmy Dean magazine ad.  There was just enough space for him to fit right between the van and the text.


The background includes a photograph of real grass next to a paved area that's somewhat cartoonish.  It reminds me of the new children's shows that combine realiastic backgrounds with animated characters.  A little white glue will set him in place. By the way, I used the Round Paperweight Kit for the puppy. 

I hope these three designs will inspire you to create a Halloween paperweight of your own for your workspace, party, or as a gift.

Next week I'll post some fun, ghoulish paperweight designs that will grab anyone's attention.

9/28/2011

Silhouette Halloween Paperweight - Witch & Owl


Because October is just three days away, I thought I'd bring you a Halloween project that's quite simple to put together.  It was created with PhotoWeights' Large Round Paperweight Kit using a Papyrus greeting card (Halloween Moon Silhouette, available at some Target stores).  The only other supplies you'll need include a pair of scissors and paper glue.

The greeting card (show above) features iridescent, hot foil paper placed behind a black silhouette.  The iridescent paper changes color when moved which really brings the design to life.


The first step in creating this paperweight is easy.  Cover the self-adhesive surface of the mounting board with the iridescent paper.  (A mounting board is included with each PhotoWeights kit).  Trim any overlapping paper.  The end result is shown above.


Lay the silhouette over the mounting board to determine which areas of the silhouette you would like to be seen in your paperweight.  Trim the silhouette leaving some extra paper for the final trim which will be done later.


Apply a small amount of glue to the reverse side of the silhouette and place it directly to the iridescent paper on the mounting board.  Once the glue has dried completely, trim any areas of black paper that extend beyond the mounting board.

Once these steps are complete, your paperweight may be finished by placing the artwork face-down onto the bottom of your paperweight.  The final step is applying the velvet bottom pad (included with each PhotoWeights kit) to the base of the paperweight.

Do you have any ideas for Halloween designs?  Please leave a comment and let us know.  We'd love to hear from you!

7/21/2011

Paperweight Featuring a Collage of Antique Sewing Needles


This paperweight features a collage of antique sewing needles and a beautiful, Victorian button set on a background created with the remains of an old needle book from England.

Working with paperweights is a little like working with shadowboxes... only in miniature.  You just need to use lightweight items that will fit within the dimensions of the paperweight's interior space (especially the depth).


For this project I'm using the remains of an old needle book for the background.  The flap of the needle book is made of textured paper with gold embossing that lends a rich look.  I'm also adding a paper package of needles, a metal needle box, and a faceted button with beautiful sparkle.


In order to create a base to build the design off of, I applied a scrap of green paper to the paperweight's mounting board and trimmed the overlapping material.


The old needle book was glued directly to the paper-covered mounting board with Aleene's Tacky Glue.  The fabric and paper that went beyond the edge of the mounting board was trimmed and the extra fabric was used to cover the exposed areas of green paper along the left and right edges.


Prior to adhering the button and needle holders to the background, I experimented with a few layouts before selecting the one above.  Each piece was put in place with Aleene's Tacky Glue.  I also used a glue dot to secure the flap of the paper package of needles.

After the glue dried completely, the design was placed face-down onto the recessed bottom of the paperweight (PhotoWeights: Heirloom Rectangle).  The paperweight was finished by applying the velvet bottom pad.

This design is more complex than the previous paperweight project that was created with a card of sewing fasteners.  All you need are a few more elements and a little patience to come up with a layout you love.

I hope you enjoyed today's sewing paperweights.  Which one do you like the most?

Craft Paperweights With Vintage Sewing Notions


I recently purchased a box of antique and vintage sewing notions I thought I'd put to excellent use to show you how easy it is to turn something simple into a unique accessory for your desk.  For you Etsy store owners, these are also perfect for resale.


For this project I chose a vintage card with three rows of metal hooks held in place by stitches of black thread.  The printed graphics, imperfect stitches, and the dimensional hooks look incredible under glass.  Instead of using a card of hooks or fasteners, you can also complete this project with a card of buttons.  Just make sure whatever you use isn't too thick to fit into the recessed cavity on the bottom of the paperweight.


Because the card wasn't large enough to cover the paperweight's mounting board, I applied a scrap of green background paper that matched the graphics.  The paper was placed on the self-adhesive side of the mounting board and the excess material was trimmed.


The card was glued to the mounting board (covered with green paper) using Aleene's Tacky Glue.


Once the glue dried completely, any portions of the card that went beyond the edge of the mounting board were trimmed.

For this project I used the Heirloom Rectangle paperweight kit.  The mounting board (with applied card) was placed face-down into the recessed area on the bottom of the paperweight.  I finished by applying the velvet bottom pad.

I'll be posting another paperweight project today that's a little more complex.  Which one is your favorite?

7/13/2011

Turn Drab Notepads Into Designer Desk Gear

Last week I discovered a new magazine called Fresh Style.  It's quickly become one of my favorite crafting magazines because it's filled so many projects - many of which I can't wait to try.

Fresh Style includes five sections:
  1. Handmade Projects - Reinvent ordinary items and thrift sotre finds with our quick and clever DIY projects.
  2. Inspiring Spaces - Find your creative muse in one of these fab interiors, from a budget-savvy city apartment to a laid-back beach house.
  3. Creative Ways - Bring a fresh look to areas in and around your home with resourceful ideas using everyday things.
  4. Life & Style - Take a look at the innovative worlds and inspiring spaces of our favorite artists and designers.
  5. Weekend Updates - Combine ingenuity and chic style in a whole-room revamp you can achieve in a weekend.

I wanted to share one of my favorite project ideas with you from the Summer 2011 issue.

Photo Credit: Fresh Style, Summer 2011

If you're anything like me, you have at least one basic notepad on your desk that you can quickly grab to jot down an appointment, address, or phone number.  The top of mine are covered with advertising for the office supply store I purchased them from.  How ugly is that?

Now you can ditch the drab notepads and be the center of office envy.

To give your 'Plain Jane' notepads a designer touch, simply cut a strip of decorative paper or card stock to fit the top of the notepad and glue it into place.  Finding beautiful, patterned paper is easy.  Craft stores such as Michael's typically carry more than 100 different designs by the sheet near their scrapbooking supplies.

I hope you love this project as much as I do.  I can't wait to bring you something new tomorrow.
Posted on Wednesday, July 13, 2011 | Categories:

6/30/2011

John Derian Paperweights

Photo Credit: Bart Boehlert's Beautiful Things Blog

One of our customers recently brought my attention to a blog post (Bart Boehlert's Beautiful Things Blog: A Visit With John Derian) that included several photos taken at John Derian's shop and Lower East Side art studio in New York.  Included among the photos was a picture of many of Derian's paperweights (above).

I've been a fan of John Derian's decoupage work for more than a decade and know that many of you have also been inspired by his designs.  Bart Boehlert's blog is a wonderful read, as well as a behind-the-scenes look at Derian's art studio.

Read: Bart Boehlert's Beautiful Things Blog: A Visit With John Derian


6/22/2011

Literary Paperweights - Turn an Antique Book Cover Into a Glass Paperweight


I love old books, especially those featuring gold embossing and other intricate designs on the cover.  I must have accumulated dozens of antique books over the years that I purchased simply because the artwork was too beautiful to pass up.

One of my passions in life is collecting antiques.  Therefore, I hate the thought of old books being sacraficed for craft projects unless they're in poor condition.  This said, there are many sources for antique books you may purchase for their cover artwork (or the artwork and illustrations inside).  These include tag sales, thrift stores, and library book sales.  Some antique stores may also carry a selection of discounted books.


The book I used for this project was purchased for 25-cents at a recent rummage sale.  It was in very bad condition and a few strings away from losing its cover.  Fortunately, the gold embossed artwork looked wonderful.  After a quick buff with a slightly damp rag, the color became more vivid and the gold's lustre was restored.


Because the cover of the book is fairly thick, I didn't need to adhere the paperweight kit's mounting board to the reverse side.  Instead, I used the mounting board as a guide to trace my cut line.  Once the artwork was cut (see above) it took less than a minute to place the artwork in the paperweight (PhotoWeights: Round Paperweight Kit) and apply the velvet bottom pad to finish.

Please leave a comment to let us know what you thought about this project.  We'd also love to hear about your project ideas.


6/09/2011

Antique Sewing Scissors With a Clip of Vintage Ribbon


One of my dearest friends celebrated her birthday last weekend.  She's collected antique sewing notions as long as I can remember.  Therefore, I thought I'd create a distinct paperweight that would add a touch of home to her office.

I purchased these antique sewing scissors years ago because I loved the patina of the metal and the delicate design of the handles.  When I placed them on a decorative background and added a clip of vintage ribbon, the scissors were transformed into something truly special.


This project required the Large Rectangle paperweight because of the area required to display the scissors.  I also used K&Company's 'Teal Floral & Letter Flat Paper' from their ancestry.com collection.  (Most craft stores like Michaels and Jo-Ann Fabrics carry more than 100 different paper designs sold by the sheet.)   To add a little more interest to the design, I added some vintage ribbon.


The photo above shows the mounting board (included in each paperweight kit) with the decorative paper applied.  I used Liquid Fusion, a clear urethane glue, to adhere the scissors to the background.  The piece of ribbon was added last.

Here are a few tips:

Prior to gluing items to your background, arrange them a few different ways and view them under the paperweight before commiting to a layout.

There are a few things to consider when it comes to selecting the right glue for your project.  You should use an adhesive that's designed for the materials you're working with (metal, wood, glass, plastic, etc.).  You should also consider damage the glue may cause to the items you're displaying if they have monetary or sentimental value.

I hope this paperweight will inspire you to look for a small treasure the next time you're at an antique shop or a tag sale.  Perhaps you already have something hidden in a box or a drawer.

What kind of curiosities can you think of that would look great in a paperweight?  We'd love to hear your ideas!


5/23/2011

Seahorse Paperweight - Displaying a Specimen in a Glass Dome Paperweight


I love displaying dimensional items in dome paperweights because the magnification has such a rich, 3-D effect.

Last weekend I purchased a small box of shells that included a seahorse skeleton. I thought this would be a nice specimen to show you how easy it is to create a magnificent paperweight using an item that has some dimension to it.

For this project I chose a dome paperweight with a 1/2" bottom recess (PhotoWeights: Dome 1/2" Recess). This features an interior cavity (display area) that will accommodate an item up to 1/2" thick. In order to determine how much of a recess your item will require, simply measure the thickest point and add enough extra space to accommodate your background material, mounting tape, glue, etc.


My supplies:   Paperweight kit (PhotoWeights: Dome 1/2" Recess); background paper (Jen Wilson Carefree "Graceful" Beautiful Blue Paper #291049); hot glue gun; seahorse skeleton.


The photo above shows the finished assembly.  The mounting board was covered with decorative scrapbooking paper that included a few shades of ocean blue.  The seahorse was glued directly to the scrapbooking paper with a hot melt gun.  Once this step was finished, the mounting board was placed directly to the adhesive side of the black bottom pad.   The assembly is now ready to apply to the bottom of the paperweight (pictured below).

 
What kind of interesting treasures can you think of to display in a paperweight?  Please share your ideas... the sillier the better!

5/04/2011

Creating a Sandy Background for Your Paperweights


I wanted to share an easy tip for creating the perfect sandy background for your paperweights.  This background is wonderful for shells and other small trinkets from the shorline.

Can you guess what I used?  Creating this look is as simple as applying sandpaper to the mounting board included in each paperweight kit.

Do you have any tips for background materials?  Please share your ideas by posting them below.


4/15/2011

Painting Glass Paperweights

Applying paint to the bottom of your paperweights is a brilliant way to frame your artwork in color.  In the example paperweight (PhotoWeights: Heirloom Square), I painted the field of glass around the display area with metallic gold paint.  The gold instantly transformed the clear glass into a splendid frame for the rose artwork.

Here's how I did it:

Clean your paperweight with a good, streak-free glass cleaner or rubbing alcohol.  Make sure there are no dust particles on the back of the paperweight prior to painting.  Use a durable paint that's appropriate for use on glass or ceramics (such as Plaid FolkArt Enamels).  It may take 2-3 coats of paint for complete coverage.

Important:  Allow the paint to dry between coats.  The paint should be completely dry prior to adhering the paperweight kit's bottom pad to the base of the paperweight.

Once the paint has dried completely, clean the interior of your display area with a soft cloth.  Place your artwork face-down onto the bottom of the paperweight and cover the base of the paperweight with the velvet pad to finish.

I wanted the paint to have a smooth texture, so I applied it with a paint brush using even strokes.  If you'd like to take a more artistic approach, you can use a variety of painting techniques and tools to create patterns and textures.

If you haven't used paint in your paperweight projects yet, I hope this project will inspire you to give it a try.  If this is something you've already done, what has been your experience?  What kind of materials and painting techniques have you used?

4/11/2011

Photographing Pets

I wanted to share the following article from the April 17, 2011 issue of Woman's Day.  I hope these tips will help you take more incredible photographs of your pets.

Better Pet Portraits
-Brooke Nevils

Take pet photos that are the cat's meow with these tips from Steve Grubman, photographer of Friskies and Alpo ads and author of Orangutans Are Ticklish.

Turn off the flash  It can frighten your animal.  Plus, there's no easy way to get rid of red-eye, says Grubman.  Instead, shoot in a place with plenty of natural light.  If your pictures come out blurry, use a higher ISO setting, which allows you to take clearer photos with no flash.

Let Fifi be the location scout  It's best to capture your pet in her favorite hangout spot, doing her own thing.  "Putting your animal in an uncomfortable or unfamiliar setting for the sake of a picture is destined to fail, because she can become skittish and withdrawn," explains Grubman.

Get on Fluffy's level  Shooting on hands and knees - from your pet's perspective - helps your furry friend connect better with the camera.  "People tend to take snapshots from a human's point of view, looking down on their pet, which can make a photo seem impersonal," says Grubman.

Focus on the eyes  "Animals talk with their eyes," says Grubman.  "It's how they tell us if they are fearful or excited or content."  Focus the lens there, and you'll instantly capture your pet's personality - and make your picture feel more dynamic.

4/08/2011

Fender Guitar Pick Paperweight

It's easy to display small mementos in your paperweights.  In most cases, you'll just need a background to attach your item(s) to.

I have to give my husband credit for this project.  He was playing his guitar in his office this morning when I asked him if he had an idea for today's blog post.  He grabbed a package of Fender guitar picks, a royal blue presentation bag, and an Heirloom Rectangle paperweight kit.  The result is pretty impressive.

When it comes to backgrounds, I prefer using decorative paper or fabric applied directly to the mounting board.  You could also apply a small piece of painter's canvas, wood veneer, or other sheet material.


If you'd like a background with the look of velvet, our velveteen presentation bags are an excellent option.  These are available in eight colors (shown above) and include enough fabric to cover two mounting boards.


Before you attach items to the background, you'll need to decide if it's important to preserve them without causing any damage.  If this is the case, be sure to use a non-permanent adhesive that won't result in discoloration or scarring.

You should always allow any wet adhesives to dry completely prior to finishing and sealing the back of your paperweight.


4/06/2011

Pinned to My Heart Paperweight

This paperweight was designed around a single object, an antique stick pin that came with an old needle cushion I picked up at a tag sale last fall.  The stick pin has some depth to it, so the generous bottom recess of the heart paperweight was the perfect fit.

Here's how I made it:


I started by covering the mounting board with a scrap of antique linen.  The mounting board is self-adhesive, so glue isn't needed for this step.  I just applied the fabric and trimmed the overlapping material.  I then applied a second layer of linen over part of the heart-shaped background using tacky glue.  The second layer has a scalloped, stitched edge and a single eyelet which adds a lot of character and dimension.

Once the mounting board was prepared with the linen, it was time to apply the additional elements that include the antique stick pin and a vintage ribbon.

The stick pin was applied directly to the background with hot melt glue.  (I needed a glue that would dry immediately and secure the pin in place.)  The ribbon was positioned to hide the hot melt glue and was held in place with a small amount of tacky glue.  The ends of the ribbon were folded over the edge of the mounting board and held in place with glue and tape.

Once the tacky glue dried completely, the design was ready to display in the paperweight.

Paperweight Kit Used:  Heart PhotoWeights