Showing posts with label Paperweight Style: Heirloom Rectangle. Show all posts

3/11/2015

Using Embossed, Lettered Stickers to Create a Personalized Name Paperweight


I've collected several packages of lettered stickers over the years.  Most of the designs are a bit on the girlie side - colorful with glitter and sparkle.  I thought I'd switch gears a little and create a paperweight that's more masculine.

This project will cover the basic steps involved in creating a layout with lettered stickers; whether you're writing out a name, a monogram, or a short sentiment.


I'm using pieces from Tim Holtz's idea-ology collection for this paperweight.  This includes a piece of 8 x 8 collage paper from a paper stash book, as well as a set of Cirque stickers.

The paperweight style shown is the Heirloom Rectangle (PhotoWeights: Heirloom Rectangle).


The first thing you'll need to do is to create a guide line for the letters on the background paper you'll be using.   Because a pencil mark may leave some traces behind, even after you erase it, I prefer using tape that has a non-permanent adhesive that won't damage the paper.  You can also use Post-it notes (as shown above.)


The Cirque stickers (idea-ology #TH93082) have a slightly metallic, aged pewter finish with embossed detailing. Each letter measures roughly 1" high.


To center your text, adhere the stickers to your background paper beginning in the middle and working your way out.  Use the guide you created earlier to help ensure your letters are even.  To justify left or right, begin applying the letters from that side.

If you're not sure if the text will fit within the display area of your paperweight, check your layout periodically with a template or by placing the paperweight directly over your work.


 After the letters are in place, use a display area template (PhotoWeights: Display Area Templates) to trace around the area you would like to display in your paperweight.


Carefully cut the background paper along your trace line.


Place the background paper (with letters attached) to the adhesive side of the mounting board that's included with your PhotoWeights paperweight kit.


Once the background paper has been attached to the mounting board, it's ready to display in your paperweight.

To finish your paperweight, place the mounting board face-down into the recessed area on the bottom of the paperweight.  Lastly, cover the bottom of your paperweight with the finishing pad that's included with your paperweight kit.

You're finished!

1/23/2014

Hearts & Buttons Paperweights


This "Hearts & Buttons" paperweight is easy to create with a few inexpensive supplies from your local craft store.  It's also a project a child can complete (with an adult's help) so they can make heir own, extra-special Valentine's Day gifts.


I used PhotoWeights' Heirloom Rectangle Paperweight Kit for this paperweight (click for product info.)  The design was inspired by a package of paper Valentine's Day frames (Recollections 309474, Michaels Crafts) that were reminiscent of the Valentines I passed out in grade school years and years ago.


The first step in creating this paperweight is to cover the self-adhesive mounting board (included in the paperweight kit) with background paper.  I used a scrap of textured scrapbook paper in a soft shade of pink.  As you can see in the photo above, the black mounting board is fairly think.  This makes it a perfect cutting guide when you trim around the outside edge.


Because I want the frame to lay flat when I glue it to the mounting board, I removed this paper "pocket" on the reverse side that was meant to hold a photo.


The frame had an added embellishment along the bottom that was held in place with two small squares of adhesive foam.  I removed it because it was much too large for this particular design. (Another piece to add to my scrap collection.)


Your photograph can be attached to the back of the frame with glue or tape, whichever you prefer.  After the photo is mounted in the frame, apply a moderate amount of glue to the area on the reverse side that will come into contact with the mounting board.  Don't apply glue too close to the edges.  For this step I used Elmer's Craft Bond Fabric & Paper Glue.  It's one of my favorite paper glues because it's tackier than white glue.  It's also acid free and dries clear.


Trim any areas of paper that overlap the edge of the mounting board.


This photo shows the finished mounting board with the background paper, frame, and photo.  It's time to dress it up with a few added touches!


Using my heart-shaped paper punch, I made a few hearts out of red, textured scrapbook paper.


A few punched hearts were added to the design with glue.  I also glued mini buttons in the center of the hearts to add a little fun and whimsy.  Once the glue dried completely, it was ready to display in the paperweight.


When you're piecing together your own paperweight design, just think of it as scrapbooking in miniature.  You can use many of the same materials and techniques.  You just have a smaller area to work with.

If you use any materials that include glitter, be sure to remove any loose particles with a brush or a few gentle puffs of compressed air.  This will help prevent glitter from floating free inside the paperweight.

What are you working on?

We'd love to see what you've been working on!  Are you creating paperweights for Valentine's Day or an upcoming event?  Please share your photos on our Facebook page.


3/12/2013

Bronze Paisley Paperweight with Ribbon and Buckle


When I thought of doing a buckle paperweight, I purchased the supplies to take it in two very different directions.  There's the bronze paisley design that's shown, and one that will involve bright pink ribbon and a round, rhinestone buckle.  I'll save the glitzy one for next week.

This is an incredibly easy paperweight to create.  You'll need some decorative background paper, a slide buckle, and a short length of ribbon that fits the buckle's opening.  Our Heirloom Rectangle paperweight kit works very well for this project.


The photo above shows the finished design before it was displayed in the paperweight.  The adhesive side of the mounting board was covered with scrapbook paper (The Paper Company, Bronze Paisley on Ivory, P89103).  Before I adhered the buckle (La Mode Buttons Style 24763) to the background with fabric and paper glue, I slid the ribbon through the buckle, making sure there was an extra 2" on each end to tuck underneath the board. 

Once the glue on the buckle sets, secure the ends of the ribbon to the back of the board with a small amount of hot melt glue.  (I prefer hot melt glue for this step because it sets instantly and won't allow the ribbon to loosen.)

When the artwork is complete, place the mounting board (decorated side down) within the recessed area on the bottom of the paperweight.  Cover the base of the paperweight with the bottom pad that's included with each paperweight kit.

See our illustrated, step-by-step instructions at PhotoWeights.com.


9/25/2012

Panic and Freak Out: Cute Frankenstein Paperweight for Halloween

With Halloween a little more than a month away, I wanted to post a fun design that will grab lots of attention at the office.  It's so cute, it may end up staying on your desk long after all the little ghouls and goblins have gone home.

I used our Heirloom Rectangle paperweight kit for this project because it has a display area that will accommodate dimensional items.  You'll also need a few embellishment stickers and a sheet of decorative paper to use as the background.

The paper I chose for the background has "Now Panic and Freak Out" written across it in several different fonts.  (The reverse side reads, "Keep Calm and Carry On")  I thought the simple, black and white design would be a great base for the colorful stickers I used in this project.  (Paper:  Recollections 'Keep Calm' - Available at Michaels)

The dimensional stickers (Recollections 224552 - Available at Michaels) are made up of three layers separated by foam tape. Because they were a little too thick to fit inside the paperweight, I removed the foam tape from the back of each sticker and applied them to the background with glue.  This reduced the thickness of the stickers by a few millimeters.

When I'm working with dimensional items, I prefer to adhere the finished mounting board to the adhesive side of the paperweight kit's bottom pad, as shown above.   This is because the dimensional stickers prevent the mounting board from laying flat on the bottom of the paperweight, making it difficult to keep everything centered while applying the bottom pad.

The last step in completing your design is to apply the adhesive pad (artwork attached and facing down) to the bottom of your paperweight.


If you have any questions or comments regarding this project, or if you need help with a project of your own, please leave a comment.  We're more than happy to help.


8/06/2012

Paperweight Backgrounds: Deconstructed Book


Backgrounds are critical when it comes to building a design around a specific item.  The paperweight pictured above features an antique watch fob with a beautiful, intricate monogram in the center.  If the fob were attached to a plain paper background, the result would have been rather dull and unimaginative.  The combination of materials and textures brings it all together perfectly.

This week I'm going to share a few tips to help you create wonderful backgrounds using re-purposed items you may already have around your home.  These materials are inexpensive and easy to find.  They'll also provide you with results I'm sure you'll love.

My first project uses pieces of an old book I found in a dollar box at a local flea market.  I chose it specifically for it's blue, marbled cover.  If you're not fond of marbled paper, look for book covers in various colors, textures, and materials.  Worn leather and embossed paper are my favorites.

Although I purchased the book specifically for it's cover, I'm using more neutral elements to create the background for this project.  I started by applying some paper from within the book to the Heirloom Rectangle paperweight kit's mounting board (shown above).  The paper is slightly discolored and has a wonderful texture.

Using a layer of delicate muslin I removed from the book's spine, I created a horizontal band and glued it to the background.  The muslin has some tattered paper attached to it, as well as some frayed areas I left untouched.

I used a little white glue to hold down a few bits of loose paper to ensure everything would stay in place.  You need to make certain your background is strong enough to hold the item you're displaying.  The surface will also need bond properly with the adhesive used to attach the item.

The watch fob was glued to the background using an adhesive that may be removed from the metal at a later time without damaging it.  When you're displaying an item of value, including sentimental value, it's important to use an adhesive that will not permanently damage your trinket or memento.

I hope this project has inspired you to find new, innovative sources for your paperweight design materials.

The next project will involve an old, leather wallet.  Please stay tuned...


3/16/2012

A New Life for an Art Deco Birthday Card


I'm sorry it's been so long since my last blog post.  I've collected so many wonderful finds over the past several weeks, I can't wait to get started on my new projects!

This paperweight design is all about finding beautiful, useful artwork on items you may otherwise overlook when you're rummaging through bins at the flea market.  Once you spend some purpose-driven time looking for items to display in your paperweights, you'll be surprised how quickly things will begin to catch your eye.


This birthday card was in a box of assorted greeting cards and other paper I purchased at the Long Beach Antique Market (Long Beach, CA) this winter.  This card is extraordinary because it features hand-painted flowers, a metallic gold banner, and an stunning ribbon in the most beautiful shade of blue. 

The photo above shows the artwork after it was attached to the paperweight kit's mounting board.  The mounting board is pre-cut to fit the Heirloom Rectangle paperweight.  Because the board is self-adhesive, no glue was needed.  The portions of the card that extended beyond the edge of the mounting board were trimmed off.

The only adhesive used for this project was a small amount of hot melt glue to attach the ribbon to the card.

Here's how the paperweight is assembled


Figure 2:  Place your artwork image-side down into the recessed area on the bottom of the paperweight.

Figure 3:  Cover the base of the paperweight with the pre-cut, self-adhesive bottom pad.  This piece is also included with each paperweight kit.


1/26/2012

Vintage Valentine Paperweights

With Valentine's Day less than three weeks away, it's the perfect time to add a sentimental touch of romance (or schoolhouse puppy love) to your desk with a vintage Valentine Paperweight.  If you don't have any old Valentine's Day cards at hand, check with a local antique shop to see if they have a selection available.

I had the luxury of sorting through a few boxes of old Valentine's Day cards earlier this month and chose three simple, die-cut cards (pictured above) for these projects.  Choose cards with fun graphics that will fit well within the display area of your paperweight.

Important note:  Vintage cards can be very delicate, so be especially careful.  A coating that makes some cards shiny may also craze when the paper is bent.

To My Sweetheart
The first paperweight was created by cutting out the artwork on the Valentine's card.  I used a metallic paper background that shimmers when the light catches it.  This color of the paper (Blue Steel) compliments the dark blue bow in the little girl's hair.  It's also a nice backdrop for the red heart.

I used a glue stick to apply the card to the background.

Puppy Love
I'm a little heartbroken about this paperweight because I accidentally destroyed it when I attempted to change the background (note the earlier warning about the fragility of clear coatings).

The background is a soft shade of green.  I later realized it should have been blue to resemble a sky over the fence (duh!).  Plan B was to replace the green paper with a photo of a sky and clouds I tore out of a magazine.  It would have looked perfect. (Emphasis on would have.)

St. Valentine Greet to You!
I chose this card because I love the floral dress and huge, oversize bows. All little girls should have such a dress.  Don't you agree?

My goal with this design was to take a die-cut card and place it on a background that would make it look as though it wasn't die-cut at all.  I chose a piece of scrapbook paper in a yellow baroque pattern that really brought it all together.

1/17/2012

Antique Puzzle Game Paperweights


Because hand-held, antique puzzle games are getting more and more difficult to find, I was thrilled to come across this Old Funny Face game from the 1920s for just $1.00.  It's a simple piece that includes a man's profile printed on a paper board, less the line for his nose.  In place of his nose, there's a metal chain that can be moved to form different shapes.


This puzzle, I thought, would make a perfect paperweight.  Not only do I love the simple, vintage graphics, I also love the fact that the game can still be played within the paperweight.

I chose the Heirloom Rectangle paperweight kit for this project because has enough of a recess to allow the chain to move freely.  It was also large enough for the card to fit with only a slight trim.


Because the card wasn't large enough to cover the entire mounting board, I applied black paper to the paperweight kit's mounting board.  The next step was to apply the card to the mounting board with tacky glue. (The finished mounting board is pictured above.)

Once the glue dried completely, the mounting board (game attached) was placed face-down into the bottom recess of the paperweight.  The velvet bottom pad, also included with the paperweight kit, was applied over the base of the paperweight to secure.

11/11/2011

Transform Last Year's Cards Into This Season's Holiday Cheer


Here's a little tip for those cards you've collected from years past.   Turn them into cute, whimsical paperweights to spread a little holiday cheer.  They make great gifts for friends and co-workers.

10/06/2011

Turn a Papyrus Halloween Card Into Three Adorable Paperweights


When I saw this Papyrus card in the store, I immediately pictured individual paperweights with a background for each character.  I love the results.  I hope you do, too.

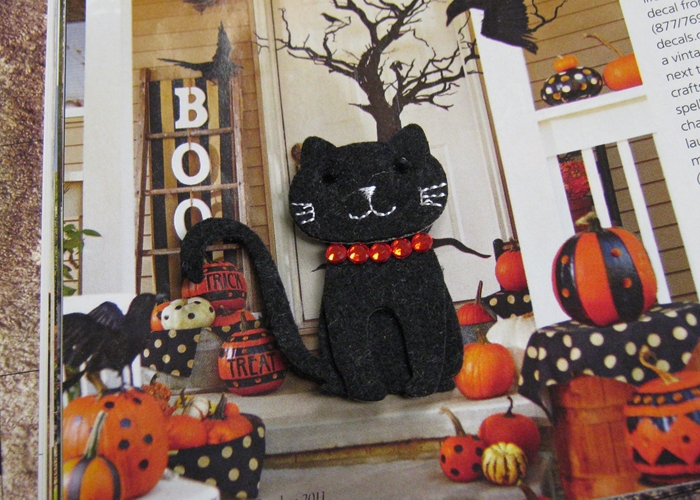
The card (Papyrus - Halloween Icons, available at some Target stores) features a black cat, puppy, and an owl.  Each piece is made of felt with added embellishments - including a red, rhinestone collar for the cat.  At a cost of $6.95 for the card, you're paying a little more than $2.30 for each character which is truly a bargain.

Here's how I created these three paperweights:


The first step is to remove the felt characters from the card.  Do this as gently as possible to prevent them from being damaged.  Be especially careful with the owl's two delicate, die-cut feet.

Let's start with the black cat...


When I think of black cats at Halloween, I picture them sitting on a front porch surrounded by pumpkins and jack-o'-lanterns.  I thought this would be the perfect background.  Here's the easy peasy part.  I simply looked through a couple magazines and found the perfect photo.  Doesn't she look right at home?


I used the Heirloom Rectangle Paperweight Kit for this project.  The magazine photo was set on the adhesive side of the mounting board (shown above) and any paper that extended beyond the board was trimmed.  The cat was glued to the background with white glue.

Now for the owl...


For the fuzzy, little owl I used the greeting card's envelope to create an orange background.  Because I placed him in a dome paperweight (Dome Paperweight Kit - 1/2" Recess), I wanted to keep the background clean and simple.  Again, I used white glue to apply the owl to the background.

Last but not least, the puppy...


The background I used for the puppy is actually a Jimmy Dean magazine ad.  There was just enough space for him to fit right between the van and the text.


The background includes a photograph of real grass next to a paved area that's somewhat cartoonish.  It reminds me of the new children's shows that combine realiastic backgrounds with animated characters.  A little white glue will set him in place. By the way, I used the Round Paperweight Kit for the puppy. 

I hope these three designs will inspire you to create a Halloween paperweight of your own for your workspace, party, or as a gift.

Next week I'll post some fun, ghoulish paperweight designs that will grab anyone's attention.