Showing posts with label Costume Jewelry. Show all posts

5/03/2016

A Modern Spin on a Vintage Mother's Day Pin


In honor of Mother's Day, I wanted to create a paperweight for our Design Blog that put a modern spin on a classic 1950s Mother's Day pin.

Some lipstick red paint and a scrap of toile print paper are all it took to give this pressed metal relic the character it desperately needed.


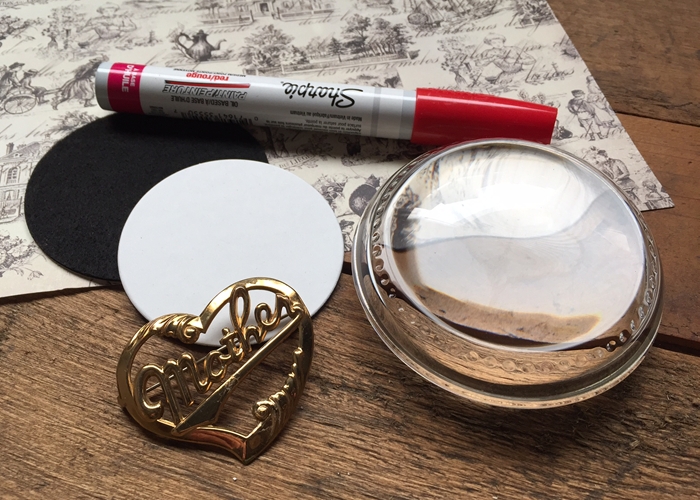
The materials I used for this project include an Heirloom Dome Paperweight Kit, scrapbook paper with a toile pattern, the "Mother" pin, and an oil based paint pen in red (Sharpie).


I started by removing the pin mechanism with a pair of pliers so the back of the piece would lay flat.


The pin was placed on a scrap piece of cardboard before it was painted with an oil based paint pen made by Sharpie.  Spray paint would also work very nicely for this step.  You could even try a bright shade of nail polish.


The self-adhesive mounting board was placed on the back of the scrapbook paper and trimmed with a pair of scissors.


After the paint dried completely, I applied hot melt glue to areas of the back of the pin where there was a larger surface to work with.  (I avoided smaller, intricate areas such as the letters because the glue would be visible.)


After the pin was glued to the mounting board, the mounting board was placed in the center of the adhesive side of the paperweight kit's bottom pad.  The adhesive area of the bottom pad that remains exposed is what will adhere to the bottom of the paperweight.


After the paperweight was cleaned to remove any dust and fingerprints, the bottom pad was centered onto the bottom of the paperweight and pressed into place.


This design idea can be applied to so many different things... coins, Monopoly pieces, or something as simple and ordinary as a key.  Brightly painted, these objects become art.

3/23/2015

Create a Bold, Statement Paperweight Using a Broken Pendant


Once in a while, something in my stash of craft supplies ends up being crushed or broken.  This was the case with this 'art-i-cake' crown and wings pendant.  The piece split in two which resulted in the loss of one of the rhinestones.

I didn't have the heart to throw the pendant away, so I decided to repurpose it as a piece of desktop bling.


This is one of those simple projects that only requires some background material (paper, fabric, etc.), as well as the dimensional item that will be the focal point of your design.

As is the case with all dimensional items, make sure it fits within the recessed area of your paperweight.  The recessed area is the ceiling height of the interior display space.

I used the Round Paperweight Kit (PhotoWeights: Round Paperweight Kit) which includes a self-adhesive mounting board and bottom pad, as shown above.


One of my favorite supplies to keep on hand are small books/stacks of cardstock scrapbooking paper.  These typically include a variety of colors and patterns, giving you a virtual library of backgrounds to choose from.


Place the adhesive side of your mounting board onto the reverse side of the paper (or other material) you'll be using as your background.


Using a pair of scissors, cut any material that extends beyond the edge of the mounting board.  The mounting board will act as an excellent cutting guide.


If you're working with a pendant that has a loop or a bail, remove it with a pair of jewelry nippers.  Use an emery board or fine sand paper to smooth the edges.


In the following steps I'll essentially reconstruct the broken pendant by gluing the pieces to the mounting board.


Lay the pieces of the pendant in the center of your mounting board and mark the edges of the pendant by placing removable tape on the board.  The tape will act as a guide when you're ready to glue the pieces into place.


I prefer to use hot melt glue for pendants that have impressed areas on the back surface.  Liquid glue will run, especially when it pools into impressions.  Hot melt glue will fill in gaps between the pendant and the mounting board.


After the pieces of the pendant were glued to the background, the rhinestone that had previously popped out was re-set with clear glue.


After the liquid glue holding he stone dried completely, the mounting board was placed face-down into the recessed area on the bottom of the paperweight.


To finish, I covered the bottom surface of the paperweight with the self-adhesive bottom pad.

7/10/2013

Applying Charms and Accents to the Top Surface of Your Paperweight


I love finding new products to use in my paperweight designs.  The latest is a collection of charms called art-i-cake by Amy Labbe (Distributed by Horizon Group USA, Inc.)  The designs truly capture the look of handcrafted pieces I've seen in magazines featuring mixed media artwork.  The quality is also much higher than many other charms and findings sold in typical craft stores.


Amy Labbe's line of charms (pictured above) includes some pieces thin enough to fit the display area depth of most of our paperweight kits.  Unfortunately, many of the larger, statement pieces are far too big.  The solution?  Think outside the box... or the paperweight.

This idea post is all about taking advantage of the prime real estate on the top surface of your paperweight by applying charms, decorative accents, and other items.


For this project I used the "Sassy Girl" charm (Item AL44251, UPC 765940442517) which came on a card with a cute shoe charm I'll save for another project.  I also used PhotoWeights Oval Paperweight Kit.


I applied a clear urethane glue to the reverse side of the charm (Liquid Fusion).  Choose a maximum strength glue that will bond to glass, as well as the material being glued to the paperweight.


Here's how I applied the charm to the paperweight.  Because the glue will run, I left the charm face-down on my work table.  After cleaning the top surface of the paperweight with glass cleaner,  I slowly positioned the paperweight over the charm and lowered it into place.  Once the glass made full contact with the glue, I carefully turned the paperweight over, made sure the charm was centered, and allowed the glue to dry thoroughly.


After the glue has dried, and your charm is securely bonded to the glass, you can place a photo, decorative paper, fabric, or other material underneath the glass to act as a background.  (Simply use the finishing kit that comes with each paperweight kit.)  You can also leave the paperweight as it is if you prefer the look of the clear glass.


I'm a huge fan of scrapbook paper that's sold by the individual sheet.  Don't be afraid to play with patterns.  In the photo above, I show the paperweight against two very different papers - solid green and a black and tan damask.  As you can see, the result is two very different looks.  This sassy girl paperweight called for something bold!  (Recollections, Black and Tan Damask, 12" x 12" scrapbook paper, Michaels).


I hope this post has given you some new ideas on how to design and finish your paperweights.  If you have any questions, or if you need some help or advise on a particular design dilemma, please don't hesitate to send me an email or leave a comment.  I'm always happy to help.


1/05/2012

Glass Dragonfly Paperweight with Script Background


Whenever I find myself at Michaels, I spend the longest time looking through their selection of charms and pendants.  With so many to choose from, it's hard to limit myself to just two or three.

Some of my favorite pendant designs are by Bead Landing, a brand exclusive to Michaels.  Deco Chic, Bead Corner, and Industrial Chic are a few other lines with unique, interesting pieces.

It's easy to design a paperweight around a pendant.  The most difficult hurdle is choosing one that will fit your paperweight's display area, especially the depth.  Here's a tip...  Bring your paperweight to the store with you so you can see exactly how the pendant will look under glass.

The silver dragonfly paperweight was simple to assemble and cost just $5.50 for materials, in addition to the cost of the paperweight kit.  Here's how it was made:

Materials (above):  Deco Chic dragonfly pendant (Item #DC19923-101, Hirschberg Schutz & Co., Inc.), Script Cream scrapbook paper (Recollections, Michaels Stores), Dome Paperweight Kit (PhotoWeights).  You'll also need a hot melt glue gun.

Cover the round, self-adhesive mounting board (included in the paperweight kit) with a small piece of the scrapbook paper.  When finished, trim any paper that extends beyond the edge of the board.  Apply the pendant directly to the paper with hot melt glue.

Once the glue is has cooled, place the mounting board in the center of the adhesive-side of the bottom pad (also included in the paperweight kit).  Press gently around the pendant to ensure a tight bond.

 
After you've cleaned your paperweight with streak-free glass cleaner, finish by applying the bottom pad to the base of the paperweight.  Press along the outside edge to secure.

If you're into vintage, try using antique ephemera in place of the scrapbook paper.  A vintage postcard or advertising would make an excellent background. Be on the lookout for buttons, tokens, and pieces of antique jewelry to complete the look.  I recommend browsing through boxes of small, inexpensive baubles at antique shops and swap meets.  You never know what you'll find!

4/06/2011

Pinned to My Heart Paperweight

This paperweight was designed around a single object, an antique stick pin that came with an old needle cushion I picked up at a tag sale last fall.  The stick pin has some depth to it, so the generous bottom recess of the heart paperweight was the perfect fit.

Here's how I made it:


I started by covering the mounting board with a scrap of antique linen.  The mounting board is self-adhesive, so glue isn't needed for this step.  I just applied the fabric and trimmed the overlapping material.  I then applied a second layer of linen over part of the heart-shaped background using tacky glue.  The second layer has a scalloped, stitched edge and a single eyelet which adds a lot of character and dimension.

Once the mounting board was prepared with the linen, it was time to apply the additional elements that include the antique stick pin and a vintage ribbon.

The stick pin was applied directly to the background with hot melt glue.  (I needed a glue that would dry immediately and secure the pin in place.)  The ribbon was positioned to hide the hot melt glue and was held in place with a small amount of tacky glue.  The ends of the ribbon were folded over the edge of the mounting board and held in place with glue and tape.

Once the tacky glue dried completely, the design was ready to display in the paperweight.

Paperweight Kit Used:  Heart PhotoWeights