Showing posts with label Dimensional Items. Show all posts

8/10/2017

Emma's Star Dust - Using Small Glass Vials in Your Paperweight Designs


I've wanted to design a paperweight around a glass vial for the longest time.  I've recommended them to customers who have asked for my help with items that needed to be encapsulated before they were displayed in a paperweight.  For some reason, I've never worked with one until now.

This particular design is centered around a glass vial filled with crystal glitter.  There's a silver bail attached to the cork that seals the vial.  Through this, a length of thin twine was looped and tied with a small key and a paper tag that reads, "Emma's Star Dust."

There are so many different variations of this design that can be achieved by changing the contents of the vial, the text on the tag, etc.  A few that come to mind are wishes, dreams, fairy dust, and potions.  If you rolled up a dollar bill and placed it in the vial, this could easily become Emma's Vacation Fund.


This project included just a few supplies.  I used an adhesive label for my background, some crystal glitter, a glass vial with cork lid, a key charm, and some thin twine.  The paperweight kit is the Heirloom Dome which is available at PhotoWeights.com.

A design like this typically involves selecting a piece of decorative paper to use as the background.  Because the packaging for the sheet of labels I used was the perfect color, I used this instead.

After I placed the adhesive label onto the paper, I centered a Design Area Template around the label to trace a cut line.


After I cut the paper along the line I traced, it was placed on the adhesive side of the mounting board (included with each PhotoWeights kit).


Putting glitter in a tiny vial can be tricky.  If you don't have a small funnel, you can do what I did.  Take a sheet of paper and crease it lengthwise.  The crease will guide the glitter right where you want it to go.


I didn't fill the glass vial completely with glitter because I wanted the glitter to have some movement.  Before I replaced the lid, I placed a small amount of clear glue around the cork to make certain it would stay in place.


To prevent the glass vial from rolling across the flat background, I used an embossing tool to create an impression in the paper.  This impression is also where I applied clear glue.  (I used Beacon 3-in-1 Advanced Craft Glue).


Here's how the vial appeared after it was glued to the background.


My mini paper labels were created on my computer using a basic publishing program.  I printed a few on card stock paper, just in case I needed extras.


After my label was cut out, I used a fine embossing tool to create a hole.  If you don't have an embossing tool, a large pin should work nicely.


I looped some thin twine through the key charm, the label, and the bail on the cork before I tied the ends into a knot.


The paper label was attached to the background with hot melt glue.  There are two reasons for this.  Not only does it adhere instantly, the hot melt glue acts as a spacer to lift the label up from the background to give it some dimension.

I used my embossing tool to mark the spot (pin hole) where I applied hot melt glue to hold the key in place.


Here's what the finished design looked like before it was placed in the paperweight.


To display the finished design in the paperweight, I centered it onto the adhesive side of the (black) felt bottom pad (included with each PhotoWeights kit).


The artwork was placed face down into the bottom recess of the paperweight.  The adhesive side of the bottom pad holds it in place.


Now that I've created this sample paperweight, I think I'll create one that's labeled Susan's Spare Time.  I can always use a little extra of that.

I hope this design idea inspires you to create a paperweight of your own.


5/03/2016

A Modern Spin on a Vintage Mother's Day Pin


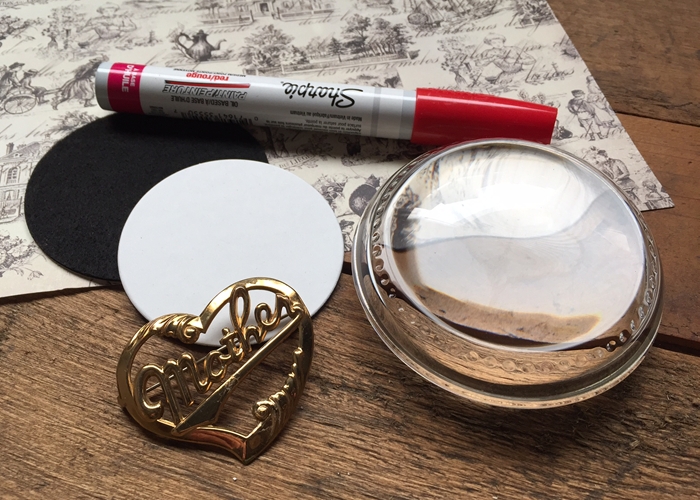
In honor of Mother's Day, I wanted to create a paperweight for our Design Blog that put a modern spin on a classic 1950s Mother's Day pin.

Some lipstick red paint and a scrap of toile print paper are all it took to give this pressed metal relic the character it desperately needed.


The materials I used for this project include an Heirloom Dome Paperweight Kit, scrapbook paper with a toile pattern, the "Mother" pin, and an oil based paint pen in red (Sharpie).


I started by removing the pin mechanism with a pair of pliers so the back of the piece would lay flat.


The pin was placed on a scrap piece of cardboard before it was painted with an oil based paint pen made by Sharpie.  Spray paint would also work very nicely for this step.  You could even try a bright shade of nail polish.


The self-adhesive mounting board was placed on the back of the scrapbook paper and trimmed with a pair of scissors.


After the paint dried completely, I applied hot melt glue to areas of the back of the pin where there was a larger surface to work with.  (I avoided smaller, intricate areas such as the letters because the glue would be visible.)


After the pin was glued to the mounting board, the mounting board was placed in the center of the adhesive side of the paperweight kit's bottom pad.  The adhesive area of the bottom pad that remains exposed is what will adhere to the bottom of the paperweight.


After the paperweight was cleaned to remove any dust and fingerprints, the bottom pad was centered onto the bottom of the paperweight and pressed into place.


This design idea can be applied to so many different things... coins, Monopoly pieces, or something as simple and ordinary as a key.  Brightly painted, these objects become art.

6/15/2015

This Child's Antique Mirror Makes an Adorable Papeweight... Perfect for Quick Makeup Checks at Work


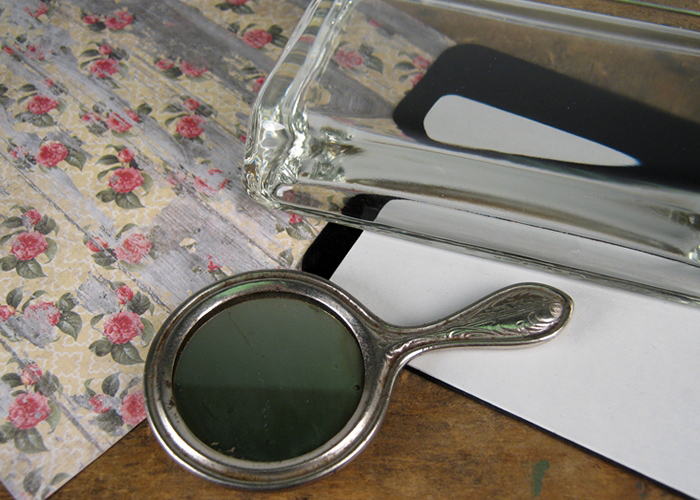
The centerpiece of this paperweight design is an antique hand mirror from a child's set.  It's made of nickel plated metal that I was able to brighten up with a little silver polish.

When the mirror is set it against a background of vintage-inspired paper, it's transformed into a special and unique piece.  It's also something you can keep within reach for those times you need to do a quick check of your hair or makeup at work.


I used the Large Rectangle Paperweight Kit (PhotoWeights: Large Rectangle) for this project.  The only other supplies I used included a scrap of decorative paper, the mirror, and some ribbon.  A hot glue gun was also used.


The first step to creating a paperweight that features a dimensional object is to create a background for the object to be adhered to.  This is done by applying paper, fabric, or other type of material to the self-adhesive mounting board that's included with each PhotoWeights paperweight kit.

In the image above, the adhesive side of the black mounting board was placed on the reverse side of a piece of decorative, floral paper.  (The floral paper had another design printed on the reverse side.)


After your background is attached to your mounting board, use a pair of sharp scissors to trim any material that extends beyond the edge of the board.  (The board acts as an excellent cutting guide.)


I tied a small bow around the handle of the mirror to dress it up a little.  The green bow coordinates with a color found on the floral paper I used.

Tip:  Double check to make certain your mirror and any embellishments you add will fit within the display area of your paperweight, especially the depth.


After I cleaned the mirror, I placed it on the mounting board and centered it.

Because I'll be using hot melt glue, there will be little opportunity to reposition the mirror once it's glued down.  I used removable tape (washi tape) as a guide to mark where the left and right of the mirror should be positioned.


The center of the back of the mirror is slightly raised, so I applied the hot glue around the center to avoid adding any additional thickness to the final design.  A dab of glue was also placed on the handle for added support.


After the mirror was secured in place, the guide tape was easily removed.


The mounting board (with mirror attached) was placed face-down into the recessed area on the bottom of the paperweight.


I finished the paperweight by applying the self-adhesive bottom pad, included with each PhotoWeights paperweight kit.


FINDING A MIRROR

Antique mirrors such as the one I used may be found on websites such as Etsy.com and Ebay.com. You need a smaller mirror which may be described as a toy mirror, doll mirror, or child's mirror.

Most craft stores sell small, thin, unframed mirrors that are perfect for creating mirrored paperweight designs.  You may also be able to use the mirror from an old compact.


5/14/2015

Framing a Photo in a Paperweight - Pearls & Glitter


I wanted to start a new series of designs that will focus on gorgeous, creative ways to frame photographs within your paperweights.

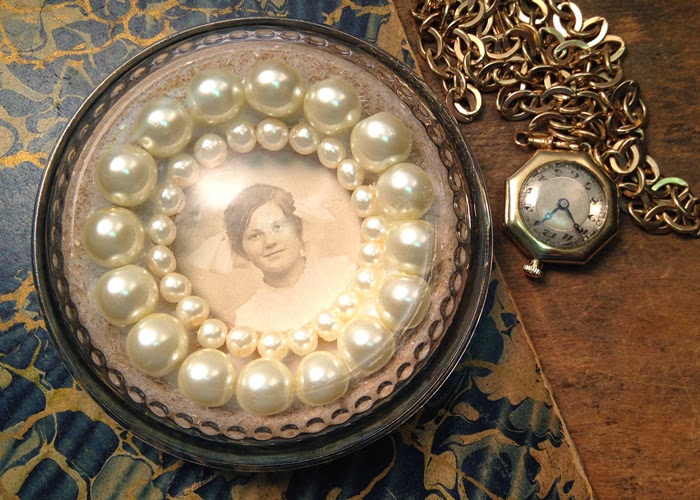
The first paperweight in this series requires just a few supplies and tools to create a vintage-inspired design that will beautifully frame a modern or period photograph.  Although I used pearls for this paperweight, you can use other bead and background colors to create a completely different look.

To re-create this paperweight, you'll need the following iems:  Heirloom Dome Paperweight Kit (PhotoWeights: Heirloom Dome), two sizes of pearl beads (4mm and 8mm), swatch of paper in a color of your choice, clear glitter, white glue, Aleene's Tacky Glue, and a 1" circle hole punch.


The first step to creating this paperweight design is to trace the area from your circle hole punch onto the background paper you're using.  I did this by punching a hole in a business card and tracing within the opening.


The 1" circle was traced onto the paper first so I could use this as a center reference when I traced a larger circle that's the size of the Heirloom Dome's display area (PhotoWeights: Display Area Template).


Using a pair of sharp scissors, I cut along the outside line.


Many hand-held hole punches available in craft stores limit the distance you can punch from the edge of the paper.  To compensate for this, I cut a straight line to remove enough paper to allow me to punch out the circle I traced earlier.

Because the paper will be covered in the final design, the seam that will be left won't be visible.


Center the traced circle into the viewing window of the hole punch, usually found on the bottom.  Once centered, punch out the desired area.

The hole punched into the background paper will frame your photograph.


After you've cut your photograph to fit within the 1" circle, apply white glue (Elmer's is just fine) around the opening.  Be sure to spread the glue evenly to prevent it from seeping out from underneath.


After the glue used in the previous step has set for a few minutes, you can apply the piece to the adhesive side of the mounting board (included with each PhotoWeights paperweight kit).  Also affix the small portion of paper that was cut earlier.


Now that the photo and background paper are attached to the mounting board, it's time to get to work!

I applied Aleene's Tacky Glue around the photograph.  (I prefer to use tacky glue for this type of application because it's thick and stays in place.  It also remains flexible while it's drying, making adjustments easy.)   If you don't apply enough glue to fit two rows of beads, you can always add more glue later.


I used two sizes of beads in this paperweight, 4mm and 8mm.  The 4mm beads were applied first, circling the photo.  The 8mm beads followed.  Be sure none of the holes in the beads face upward.


After all the pearls are in place, you can make any necessary adjustments to even out the spacing and make sure the holes aren't visible from above.


I didn't want to leave the paper around the pearls untouched, so I decided to cover this area with clear glitter.  To do this, I started by brushing a layer of white glue outside the larger row of beads.


With the piece over a small bowl, I sprinkled the clear glitter onto the white glue.  Tap the edge of the card onto your work surface to remove excess glitter.


Here is a photo of the finished work, ready to display in the paperweight.


VERY IMPORTANT

One thing that's difficult to capture in photos is the amount of drying time that is required before you can place your finished artwork in the paperweight.

If you seal up your paperweight while the glue is wet, evaporation from the glue will cause the inside of your paperweight to become cloudy and humid.

I recommend allowing your artwork to dry for at least 24-hours.  When the glue is completely dry, check to make sure all the beads are securely in place.  You should also remove any stray particles of glitter with a small, dry paint brush and/or gentle puffs from a can of compressed air.


To finish your paperweight, center your artwork onto the adhesive side of the bottom pad and press it in place to secure.


After you've cleaned your paperweight with streak-free glass cleaner, apply the bottom pad face-down onto the base of the paperweight.