Showing posts with label Paperweight Style: Elegant Oval. Show all posts

6/21/2016

Add a Little Color to Your Paperweights With Enamel Paint


Applying paint to the underside of your paperweights can change the appearance of your finished design entirely.  You can paint the glass to coordinate with the decor of your office.  You can also choose a color that compliments the artwork or photograph being captured.

Painting your paperweights can be as simple and straightforward as using a single color, like the example pictured above.  You can also use decorative painting techniques to achieve specific looks.

My next few blog posts will show you several examples of how you can use paint with PhotoWeights.


I recommend Plaid's line of FolkArt Enamels designed specifically for glass and ceramics.  These are available in most craft stores and sell for around $1.99 for a 2oz bottle.

I'm going to start with a simple project that involves a single shade of paint applied to our Elegant Oval Paperweight Kit.  The color is Lime Green (Plaid FolkArt Enamels 4138E). Although this paint has excellent coverage, you should plan to do this in no fewer than two coats with one hour of dry time in between.  The number of coats required will vary by paint brand and color.

As you're painting, keep a few slightly damp cotton swabs on hand to clean up your lines and wipe away small mistakes.

Remember to follow the instructions for the particular paint you're using.  Also, be sure to thoroughly clean your paperweight before you begin.


The first coat of paint (shown above) should be applied evenly to ensure you've covered all areas of the glass.  If you look closely (click the image to enlarge), you can see the paint appears semi-transparent in some areas.  This is perfectly fine.

This first coat is what will be visible through the top surface of the paperweight, so turn it over occasionally to check your work for air bubbles and skipped spots.  Wait one hour before applying a second coat, or according to your paint's directions.


The second layer of paint should give you full coverage.  If any spots need to be touched up, this can be done when the paint is mostly dry.


The photo above shows how the paint will appear when viewed through the paperweight.


CURE TIME

FolkArt enamel paints have a recommended cure time to make the paint top-rack, dishwasher safe.  Although you're probably not going to run your paperweights through the dishwasher, I cure my paint because it makes it more durable.

The cure time for the paint I used is 21 days if you're air drying.  You can also use the method I prefer which is to air dry for 1 hour before baking it in the oven.


To cure the paint in the oven, I set the paperweight on a metal cookie sheet, placed it in a cold oven, and set the temperature to 350F.  After the oven reached temperature, I set my timer for 30-minutes.  After a half-hour, I turned the heat off and allowed the paperweight to cool in the oven before I removed it.

Be sure to follow the instructions for the particular paint you're using.

After the paint has cured, you can personalize your paperweight as you normally would.  The self-adhesive bottom pad can be adhered directly to the painted rim.


3/24/2015

Make a Scrapbook Embellishment Sing with a Touch of Crystal Glitter


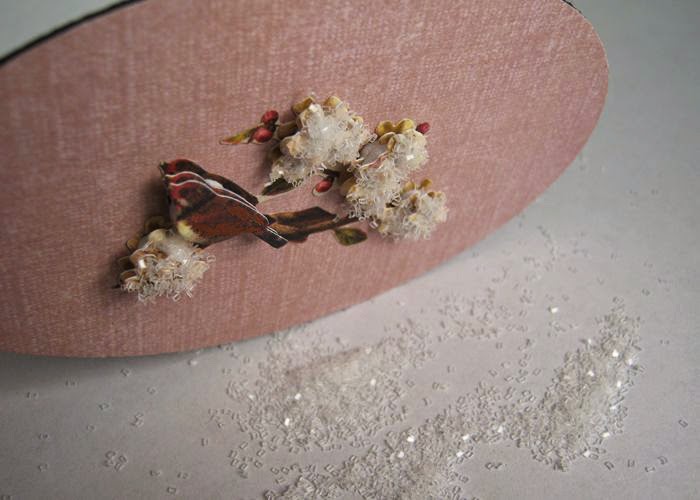
Some scrapbook embellishments can use a little extra something to make them truly special; maybe a few rhinestones or some metallic paint.  In this example, I added crystal glitter to the flowers of a dimensional sticker to give it more beauty and sparkle.


The sticker I used came from a collection of Grand Adhesions Dimensional Stickers (BW Flora & Fauna, Birds and Leaves) designed by Brenda Walton for K&Company.  I also used a sheet of pink paper from K&Company's Julianne Solid Mat Pad.

I chose the Elegant Oval Paperweight Kit for this project because I thought it would frame everything beautifully.  (PhotoWeights: Elegant Oval)


The first step in creating a paperweight that features an embellishment, memento, or other curiosity is to construct a background on which to place it.  This is done by covering the self-adhesive mounting board (included with each PhotoWeights paperweight kit) with a piece of decorative paper.  You can use a variety of other materials, too.  Just be sure the item you're displaying can be adhered to it properly.


Using a pair of scissors, I cut the paper that extended beyond the edge of the board.  The edge of the board will act as an excellent cutting guide.


After the sticker was applied to the center of the mounting board, I went over it with an embossing tool and gently pressed down to make sure the adhesive came into contact with the background paper.  It's especially important to press down the edges and any small parts of the sticker such as the delicate leaves shown above.  If you don't have an embossing tool, something similar with a smooth point will also work.


After the sticker was securely in place, I applied white glue to the flowers and used my embossing tool to spread the glue evenly.


A generous amount of crystal glitter was sprinkled onto the glue.  (I placed a sheet of paper underneath the mounting board to catch the loose particles.)


I gently knocked the edge of the mounting board onto my work surface to free any loose particles.


After the glue was completely dry, I used a soft paint brush to remove any remaining pieces of loose glitter.  I was left with the finished design pictured above.

When you're working with glitter, it's important to remove any loose particles to prevent them from floating within the interior of your paperweight.


The mounting board was placed face-down into the recessed area on the bottom of the paperweight.


To finish, I applied the self-adhesive pad (included with each PhotoWeights paperweight kit) over the bottom surface of the paperweight.


You're left with a beautiful paperweight design that will last for years to come.


12/29/2014

Personalizing Paperweights With Names, Monograms, and Text


Many of our customers have asked for a little guidance when it comes to personalizing paperweights with a name, monogram, or other text.  These basic, step-by-step instructions are an excellent starting point.  They can be also be modified in several different ways.


In most cases, the first step in designing a paperweight with text is to create a layout using a desktop publishing program.  If you don't have publishing software, a word processor or image editor with text capabilities can also be used.

Our website includes the display area measurement for each of our paperweight kits.  Using a shape or drawing tool with your ruler visible, draw a shape (circle, oval, rectangle, etc.) that is the same size as the paperweight's display area.  For this project I'm using the Elegant Oval Paperweight Kit (PhotoWeights: Elegant Oval)  which includes a smaller display area in the center.  I've drawn two oval shapes.  The outside oval is the size of the mounting board.  The inside oval marks the actual display area.

I'm going to print my name onto decorative paper, so the name is all I'll print.  If you wish, you can place a background image or solid color behind your text so it prints as ready-to-use artwork.

I deleted both outlines prior to printing the name because I'm going to position a template over my artwork to create a cut line.


I printed a test copy so I could check to make sure the name fits well within the paperweight.


Because I'm printing the name onto uncoated, textured scrapbooking paper, I need to print this using my ink jet printer.  Toner doesn't adhere well to textured paper.  Many decorative papers have coatings that can damage laser printers.  If you're using a laser printer, use only laser-safe paper.

I taped a piece of scrapbook paper to a sheet of letter sized paper because my printer has a difficult time recognizing odd sized pages.  I recommend leaving 1-2" of space at the top of the page to allow room for the tape.  This will also help the page feed properly into your printer.

Be certain there are no adhesive areas of tape exposed, including pieces that may have gone beyond an edge of the paper.  You don't want any tape to catch inside your printer.

All printers are different.  Consult your user's guide.


The name was printed using an "automatic" paper setting on the highest quality setting possible.

I used a template (PhotoWeights: Display Area Templates) to draw a pencil line that will act as my cutting guide.


The name was cut out with a pair of scissors.  If any traces of the pencil line will appear in your paperweight, gently remove them with an eraser.


Place the printed paper onto the adhesive side of your mounting board and press all over to ensure an even bond.


Place the board face-down into the recessed area on the bottom of your paperweight.  Be sure to clean the paperweight with glass cleaner prior to completing this step.  Also be sure the bottom surface of the glass if free of smudges and dust particles.


Finish by applying the self-adhesive bottom pad to the underside of the paperweight.


This step-by-step guide can also be used to create monogram paperweights and paperweights with poetry, quotes, and other text.

If you have any questions, or if you need help with your particular paperweight project, please feel free to contact me directly at susan@photoweights.com.

7/11/2013

Collection of Low Profile Skeleton Keys from K&Company


One of the many memories I have of my grandmother's house, a small bungalow just outside Los Angeles, is a collection of decades-old keys that hung in a kitchen cabinet, seemingly forgotten.  Perhaps the only thing they opened was a memory or two - a first car, her childhood home, maybe a key she brought with her from Germany when she was a child.  What I would give for those keys now!

Skeleton keys are among my favorite items to use in my paperweight designs.  Unfortunately, many keys have a profile too deep to fit the interior of several PhotoWeights paperweight styles.  This is why I wanted to share a recent find that offers the look of timeworn keys while providing a low profile and a flat surface that make them easy to adhere to fabric and paper.  The set is called Life's Journey Keys Metal Art (565227) by K&Company.  (UPC 643077565227).


The "Life's Journey" collection includes ten different keys that range from 1.5" to 3.5" long with a thickness of 1/16" - 1/8", depending on the style.  The finishes include aged brass, copper, and steel.  The photo above shows the depth of one of the keys in the collection.


These keys are perfect when displayed alone on scrapbook paper.  You can also use them to create mixed media vignettes for your paperweights.

If you need some inspiration for your paperweight designs, visit a local craft store to see all the different metal art and embellishments available these days.  Bring a paperweight with you to help you envision how items will appear and fit within the display area.