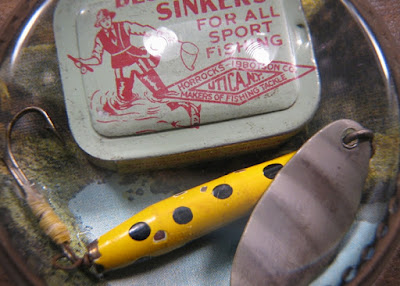
I thought I'd work on a paperweight design for the guys today. I'm not suggesting that fishing is strictly a guy thing. I just wanted to do something a little less girlie that didn't involve bows and glitter.
If you're thinking about paperweight design ideas to create for holiday gifts, a collage similar to this can be created in a variety of themes. You just need to keep the displayed items within the confines of the paperweight you're working with.
For this project I used the Heirloom Dome Paperweight Kit (PhotoWeights: Heirloom Dome). My display items include a vintage postcard (for the background) and two finds from an old tackle box; a fishing lure and a tin that once held line sinkers.
Using a template (PhotoWeights: Display Area Template) I chose the area of the postcard I wanted to use as my background and traced a cut line along the opening.
I cut the circular area out of the postcard with a pair of scissors.
I used liquid glue to attach both the tin and the fishing lure to the background (Aleene's Original Tacky Glue). I chose a liquid glue because I wanted to be able to make some adjustments if I had to. With hot melt glue, subtle shifts are impossible after a second or two.
Before I attached the fishing lure to the background, I secured the metal spinner to the yellow lure with hot melt glue so there would be no movement between the two pieces. A line of tacky glue was applied along the bottom of the yellow part before it was set into place on the background. I used a small dab of hot melt glue beneath the white material wrapped around the hook to secure the hook in place.
When you're including a fishing hook in your design, use one that does not include multiple hooks that may poke through the bottom of the paperweight.
IMPORTANT: Before you move to the next steps, it's important to allow any liquid glue to dry completely. If you place the artwork in your paperweight when the glue is still wet or even partially dry, condensation from the evaporation of the glue will form inside the paperweight. This will result in a cloudy film.
After the liquid glue dried completely, the finished mounting board was centered and placed onto the adhesive side of the bottom pad.
After I cleaned the paperweight with glass cleaner and removed any dust, I centered the bottom pad over the base of the paperweight and lowered it into place. To create a tight bond between the glass and the adhesive, I ran my thumb along the outside edge of the bottom pad.
A close up photo of the finished paperweight.
Finding the right items to use in a collage paperweight can be challenging. There are size limitations because you're working with a limited area. You also have to take weight into consideration.
When you're experimenting with layouts and designs, use your paperweight's mounting board to trace an outline on a plain piece of paper. Use this as your temporary canvas by arranging items within the trace mark. Place the glass paperweight over your layout to see how it looks. Keep doing this until you're happy with the result. (Remember to take a photograph for reference so you can easily recreate it.)
I'm always happy to help if you need help with your paperweight projects. Don't hesitate to write me at susan@photoweights.com.


